
Simple Dutch Oven Yeast Bread with a Crackly Crust
You can chill the sloppy dough in the fridge for a maximum of 3 days to build better flavor before baking this Dutch Oven Yeast Bread.
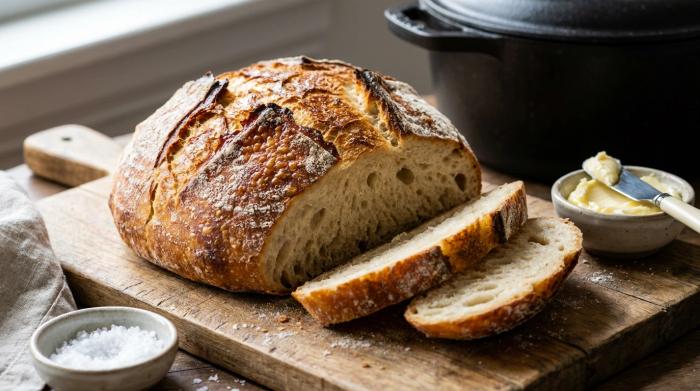
Crusty Homemade No Knead Artisan Bread is a simple Yeast Bread that forms an airy interior while resting. You can chill the sloppy dough in your fridge for a maximum of 3 days to encourage better flavor. Baking the loaf at 450°F (230°C) inside a covered dutch oven keeps steam trapped, yielding a dark, crunchy crust.
The flour and yeast
Bread flour gives the loaf a fluffier, chewier texture and a longer shelf life because it contains more protein and gluten. You can use all-purpose flour. The bread will have a slightly different texture and smaller air holes. Wholewheat flour absorbs more liquid, so you need to start with a smaller volume of flour if you use it.
Instant yeast goes straight into the bowl with the dry ingredients. If you only have active dry yeast, you must dissolve it in the warm water first before adding it to the flour and salt. Table salt requires a smaller volume measurement than salt flakes because of its fine grain size.
Mixing the wet dough
The water should feel comfortably warm. Do not use scorching hot water. High heat kills the yeast.
You mix the flour, yeast, salt, and water until no dry spots remain. The dough will look very loose and sticky. You cannot knead this mass by hand. It must hold a wet, wobbly consistency to rise properly. Do not add excess flour during this stage.
The initial rise and refrigeration
The dough needs 2 to 3 hours at room temperature to swell to twice its original size. The surface will fill with bubbles, and the whole bowl will jiggle like gelatin. Keep the bowl out of direct indoor sunlight. The sun can heat the bowl too much and damage the yeast.
You can bake the bread after this first rise. The covered dough can also sit in the refrigerator for up to 3 days to slow the yeast fermentation. The extra time allows enzymes to build more flavor.
The dutch oven
You bake the bread inside a heavy pot with a lid to trap moisture. A 10-inch (26 cm) or larger cast iron dutch oven works best.
The pot preheats in a 450°F (230°C) oven for 30 minutes before the dough goes inside. If you do not own a dutch oven, you can bake the dough inside a covered roasting pan. You can also place a metal pan on a lower oven rack and pour boiling water into it to create steam. Never use a glass pan for the water bath. The heat will cause the glass to break.
Dough Shaping
Take the cold dough out of the refrigerator 45 to 60 minutes before baking so it can warm up slightly. Scatter one tablespoon of flour on the counter and scrape the sticky dough out of the bowl.
Dust the top of the dough with a half tablespoon of flour. Use a metal dough scraper or a spatula to bring the edges inward. You want to make about 6 folds to build a rough, movable shape. Too much handling deflates the rustic structure. Excess flour dries out the mass and creates smaller air pockets in the finished loaf.
Slide a piece of crunchy baking parchment next to the dough. Flip the mass over onto the paper. The smooth side needs to face up with the seams tucked underneath.
Baking and cooling
The preheated dutch oven is extremely hot. Grab the edges of the parchment paper to lift the dough.
Lower the paper and dough directly into the pot and put the lid back on. You bake the bread covered for 30 minutes. The trapped steam helps the bread rise. You then remove the lid and bake for another 12 minutes to crisp the crust and turn it a deep golden brown.
Move the hot loaf to a wire rack. A hot loaf needs to cool for 10 minutes.
If you cut into the bread immediately, the center stays gummy and doughy. The rest period gives the inside time to finish cooking.
Serving the bread
Fresh artisan bread tastes excellent served warm with butter.
The thick, sturdy slices hold up well for many uses:
- Sandwiches
- Toast and bruschetta
- Garlic bread
- Dipping into warm soups and heavy stews
Simple Dutch Oven Yeast Bread with a Crackly Crust
Ingredients
- 3 cup bread or all-purpose flour
- 2 tsp instant or rapid rise yeast
- 1.5 cup very warm tap water, up to 130°F (55°C), not boiling or super hot
- 1.5 tsp kosher or cooking salt, halve if using table salt
Dough Shaping
- 1.5 tbsp flour for dusting
We may earn a small commission from grocery & equipment links, at no cost to you. Disclosure.
Method
Dough Shaping
Substitutions
If you use active dry yeast instead of instant yeast, be sure to dissolve it in the warm water before mixing it with the flour and salt.
If a dutch oven is unavailable, you can bake the dough on a standard baking tray or inside a roasting pan fitted with a lid.
Storage
Keep the unbaked dough in the refrigerator for up to three days to slow the yeast fermentation and develop a deeper flavor.
Choosing bread flour instead of all-purpose flour yields a fluffier texture and extends the shelf life of the baked loaf.
Store your unused yeast in an airtight container in the freezer to significantly extend its shelf life and maintain its rising power.
Serving
Serve this crusty homemade no knead artisan bread warm with butter, or slice it up for bruschetta and dipping into hearty stews.
Common mistakes
Do not slice the bread immediately after baking because cutting too early leaves the center gummy and doughy.
Resist adding too much extra flour during dough shaping because it creates a drier mass and reduces the size of your final air pockets.
Avoid placing the rising dough in direct indoor sunlight because the bowl can get too hot and damage the yeast.
Never use a glass pan if you are setting up a makeshift oven water bath because the high heat can cause the glass to shatter.
Techniques
Check your tap water temperature to ensure it is comfortably warm up to 130°F (55°C) since scorching hot water will kill the yeast.
The mixture must maintain a wet, sloppy, and wobbly consistency in the bowl to ensure a proper rise.
Use a metal dough scraper or spatula to fold the sticky edges inward to minimize added flour and preserve the wet consistency.
Measure flour by spooning it gently into your measuring cup and leveling it off with a straight edge to avoid packing too much into the dough.
Always allow freshly baked bread to rest on a wire rack so air can circulate underneath and keep the bottom crust from getting soggy.
- Store
- Keep the unbaked dough in the refrigerator for up to three days to slow the yeast fermentation and develop a deeper flavor. Choosing bread flour instead of all-purpose flour yields a fluffier texture and extends the shelf life of the baked loaf. Store your unused yeast in an airtight container in the freezer to significantly extend its shelf life and maintain its rising power.
Can I substitute wholewheat flour for the white bread flour?
It is possible, though wholewheat and wholemeal flours soak up liquid much faster than standard all-purpose or bread flours. Begin with less flour than the recipe calls for so your dough stays properly wobbly, wet, and sloppy for a good rise.
Do I have to refrigerate the dough before baking?
No, you can proceed directly to Dough Shaping and baking after the initial room temperature rise. However, chilling the dough for up to three days slows the yeast fermentation and allows enzymes to develop a much deeper flavor.
Why did my Crusty Homemade No Knead Artisan Bread turn out dense with small air holes?
Adding excess flour during Dough Shaping creates a drier mass and shrinks the final air pockets. Overworking or precisely shaping the wet dough will also deflate the desired rustic structure, so stick to just six gentle folds.
How can I bake the loaf if I am missing a Dutch oven?
You can bake the dough inside a roasting pan fitted with a lid or on a standard baking tray. To replicate the steam effect without a pot, place a metal pan on a lower oven rack while it preheats and carefully pour boiling water into it just before baking.
Can I freeze the baked loaf?
Yes, fully baked bread freezes exceptionally well once it has completely cooled. Wrap the loaf tightly in plastic wrap or aluminum foil, and place it in an airtight freezer bag to maintain its texture for up to a few months.
How should I store the bread to keep the crust crispy?
Store the cooled loaf loosely wrapped in a paper bag or inside a breathable bread box at room temperature. Placing crusty bread in an airtight plastic bag traps moisture and will quickly turn the hard exterior soft.
What is a good way to find a cozy spot for the dough to rise?
A reliable method is to place the covered bowl inside a cold, unheated oven with only the interior oven light turned on. The bulb provides a gentle, consistent warmth without creating high heat that could kill the yeast.
Add a private note
Private to this device - jot your tweaks, swaps and timings. (Syncs to your account later.)
What to serve with it
See all →





You might also like
See all →



The Friday 3-recipe dinner plan 🧡
Every Friday: three tested weeknight dinners + one shopping list, ready to go. No spam, ever - unsubscribe anytime.