
The Best Light and Tender Classic Vanilla Cupcakes
By melting the butter into hot milk and adding a little oil, you give these everyday vanilla cupcakes a plush crumb that stays soft for days.
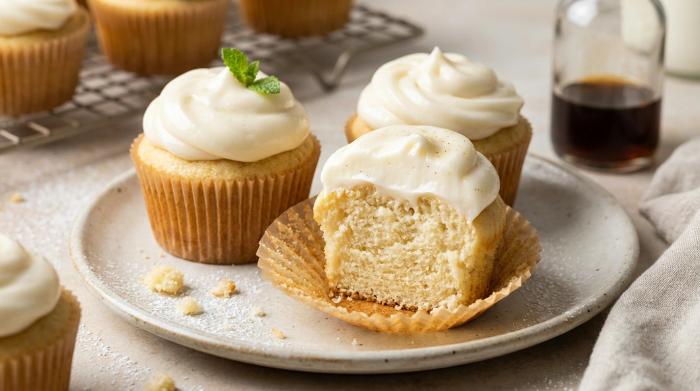
You can bake The Best Light and Tender Classic Vanilla Cupcakes in just 22 minutes. A hot milk and melted butter mixture builds a sturdy batter that bakes into tall domes. A small splash of oil keeps the plush crumb soft for four days.
The ingredients
You need specific ingredients to build a strong foam and a soft crumb.
- All-purpose flour yields better flavor and a softer crumb than cake flour.
- Cake flour causes the cupcake surface to become sticky on the second day.
- Room temperature eggs whip into a structured foam better than cold eggs.
- Large eggs should weigh between 50 and 55 grams in the shell.
- Superfine sugar dissolves more effectively during whipping than granulated sugar.
- You need a minimum of 3/4 cup of sugar to stabilize the egg foam.
- Less sugar prevents the eggs from whipping into a stiff foam.
- Full-fat milk works best. Low-fat milk yields a less tender crumb and a lower rise.
- Non-dairy milks negatively affect the final texture and rise.
- A small amount of vegetable or canola oil keeps the crumb moist for up to four days.
- Imitation vanilla extract provides a less authentic flavor than pure extract.
- Active baking powder bubbles vigorously when mixed with boiling water.
Mixing the batter
Whisk the all-purpose flour, baking powder, and salt together in a bowl.
Heat the butter and milk in a microwave-safe container until the butter melts. Do not let the milk boil. Keep the jug covered on the counter. The milk must remain hot to aid the cake's rise.
Warm a glass mixing bowl with warm tap water to encourage better egg aeration. Beat the eggs with a handheld mixer. A hand mixer makes it easy to maneuver around a small batch without excessive scraping.
Pour the sugar into the bowl while the mixer runs.
Whip the mixture for six to seven minutes. Watch for the eggs to turn pale white.
The mixture should grow to three times its original size.
Scatter the flour mixture over the egg foam in three separate parts.
Stop the mixer the moment the dry ingredients disappear. Too much mixing destroys the trapped air in the egg foam.
Pour the vanilla extract and oil into the hot milk. Scoop a little egg batter into the hot milk jug to temper it. Cold milk reduces the final rise. Un-tempered hot milk can prematurely cook the raw eggs in the main batter.
Whisk the tempered milk mixture until it looks smooth and foamy.
Pour this foamy milk mixture back into the main egg batter.
Mix the batter on a low speed until it flows easily without any lumps.
Oven preparation and baking
Turn on your oven to 350°F (180°C) a half hour in advance. Allowing the appliance this extra warmup time helps maintain steady heat when you pull the door open to insert the tin. Skip any quick warmup settings on your machine, because those fast modes prevent the appliance from holding the right temperatures required for baking.
Fill the cupcake liners only two-thirds to three-quarters full. Extra batter causes the centers to sink and the edges to overflow. A delayed bake deflates the aerated batter. Move the tin into the oven right away.
Bake the cupcakes for 22 minutes. Push a toothpick right into the center to check the crumb. The wood should pull out without any wet batter sticking to it.
Leave the baked cupcakes in the hot tin for exactly two minutes. Extra time in the pan causes the cakes to overcook and dry out.
Move the cakes to a wire rack. Wait for them to cool all the way down before you add any icing.
Serving and storage
Once the cakes reach room temperature, add a layer of vanilla buttercream. As an alternative to thick frosting, try dusting the plain cupcakes with powdered sugar or pouring on a simple glaze. You might also fill or top these treats using whipped cream paired with jam or fresh berries.
Correct storage keeps the crumb soft for days.
- Keep unfrosted cupcakes at room temperature inside a tightly closed box for up to four days.
- Chill unfrosted cupcakes in the refrigerator during very hot weather, then wait for them to return to room temperature prior to eating.
- Place parchment paper between naked cupcakes and cling wrap to prevent the plastic from tearing the sticky surface.
- Pack the cupcakes into airtight containers or resealable freezer bags before freezing them, making sure to slip a piece of parchment paper between any stacked layers.
- Thaw frozen cupcakes in the refrigerator overnight before bringing them to room temperature.
- Refrigerate frosted cupcakes if the specific frosting ingredients require cold storage.
The Best Light and Tender Classic Vanilla Cupcakes
Ingredients
- 2 large eggs, 2 oz (50 - 55 g) each, at room temperature
- 1 cup plain or all-purpose flour, cake flour is okay too
- 1.25 tsp baking powder, not baking soda
- 0.75 cup caster or superfine sugar, granulated or regular is okay too
- 0.25 cup unsalted butter, cut into 0.5-inch (1.5 cm) cubes
- 0.5 cup full-fat milk
- 1.5 tsp vegetable or canola oil
- 0.13 tsp salt
- 2 tsp vanilla extract, the best you can afford
We may earn a small commission from grocery & equipment links, at no cost to you. Disclosure.
Method
Oven & Pan Prep
Batter Mixing
Baking
Cooling
Substitutions
You can use cake flour instead of all-purpose flour, but be aware it can make the surface of The Best Light and Tender Classic Vanilla Cupcakes noticeably sticky on the second day.
Low-fat milk can replace the full-fat milk if necessary, but it yields a slightly less tender crumb and a lower rise.
Storage
Keep plain cupcakes at room temperature inside a tightly sealed storage box for up to four days.
When freezing The Best Light and Tender Classic Vanilla Cupcakes, place parchment paper between the stacked layers so the plastic wrapping does not tear the sticky surface.
Serving
Once Cooling is complete, you can top the cakes with vanilla buttercream or serve them filled with whipped cream and fresh berries.
Common mistakes
Do not reduce the amount of sugar in the recipe, as a full 3/4 cup is required to stabilize the egg foam during Batter Mixing.
Never let the hot milk mixture cool down before adding it to the main batter, because keeping it hot is crucial for achieving a proper lift during Baking.
Leaving the baked cakes in the hot tin for more than 2 minutes causes them to overcook and dry out.
Techniques
During Oven & Pan Prep, you can warm cold mixing bowls with warm tap water to encourage better egg aeration.
Mix a small scoop of the batter into the hot milk to temper it before combining all the liquids, which prevents the raw eggs from cooking prematurely.
Always sift your dry ingredients before incorporating them if they appear clumpy to prevent dry pockets in the finished cake.
Rotate your baking pans halfway through the cooking time to ensure an even golden color across the entire batch.
- Store
- Keep plain cupcakes at room temperature inside a tightly sealed storage box for up to four days. When freezing The Best Light and Tender Classic Vanilla Cupcakes, place parchment paper between the stacked layers so the plastic wrapping does not tear the sticky surface.
Can I use almond milk or oat milk instead of regular dairy milk?
Substituting non-dairy milks negatively affects the final texture and rise of The Best Light and Tender Classic Vanilla Cupcakes. Stick to full-fat dairy milk for the softest crumb.
Why does the recipe specify not to use baking soda?
You can technically substitute three-quarters of a teaspoon of baking soda in a pinch, but it produces much less lift. Active baking powder is required to bubble vigorously and build tall domes.
How do I store unfrosted cupcakes without the tops peeling off?
Place a piece of parchment paper between the naked cakes and your cling wrap before storing. This simple step prevents the plastic from sticking to the surface and tearing the delicate crumb.
What is the best way to handle cakes before packing them away?
Always let baked goods cool completely on a wire rack before sealing them in any container. Trapping residual heat creates condensation that will make the surface damp and soggy.
Why did my cupcakes sink in the middle?
Sinking centers usually happen if you fill the paper liners more than three-quarters full. Overfilling causes the edges to overflow and the middles to dip during Baking.
Why do cakes sometimes stick to the paper liners?
Peeling the wrappers off while the cakes are still warm often causes the crumb to stick and tear. Always wait until they cool completely before you try to unwrap them.
Why do I need to add batter to the hot milk before mixing everything together?
Mixing a small scoop of the batter into the hot milk tempers the liquid. This crucial step during Batter Mixing prevents the hot milk from prematurely cooking the raw eggs when combined with the rest of the bowl.
Should I alter my method if I use dark metal muffin tins?
Dark metal absorbs heat much faster than light aluminum pans. You may need to check for doneness a few minutes early to prevent the edges from drying out or over-browning.
How should I serve these if I do not want to make a heavy buttercream?
You can easily dust the plain cakes with powdered sugar or drizzle them with a simple glaze. They also pair wonderfully with whipped cream and fresh berries.
Add a private note
Private to this device - jot your tweaks, swaps and timings. (Syncs to your account later.)
What to serve with it
See all →



You might also like
See all →

The Friday 3-recipe dinner plan 🧡
Every Friday: three tested weeknight dinners + one shopping list, ready to go. No spam, ever - unsubscribe anytime.