
Soft and Sweet Traditional Hot Cross Buns from Scratch
A tender, milk-based dough packed with sweet sultanas and bright orange zest is the foundation of these classic Hot Cross Buns.
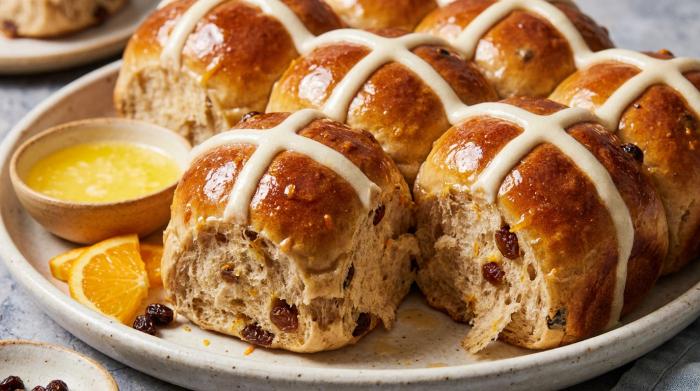
A tender, milk-based dough packed with sweet sultanas and bright orange zest makes 12 Soft and Sweet Traditional Hot Cross Buns from Scratch. Bread flour provides a fluffy texture, while a thorough knead creates the structure needed for a tall rise. The buns bake at 350°F (180°C) until golden.
The Dough & First Rise
Active dry, instant, rapid rise, and fresh yeast are all viable options for this dough. If you select fresh yeast, you will need 27 grams crumbled into the milk to foam before use. You can easily test older yeast for viability by stirring it into warm water with some sugar. A foamy surface should appear after ten minutes. Expired yeast will prevent the dough from rising. Temperature is just as important to activate the yeast safely, so only warm the milk to a pleasant bath-water temperature. Overheating the milk will destroy the yeast and completely stop the rising process.
While standard white flour works perfectly fine, bread flour will give your buns a fluffier texture. Your exact flour needs will fluctuate depending on the humidity in your kitchen, meaning you will likely use more during the summer and less in the winter. Add any extra flour very sparingly. The goal is to reach a point where the dough clears the sides of the bowl but still feels slightly sticky. If you add too much flour, the dough becomes dry and bakes into hard, dense buns.
An electric machine fitted with a dough hook will bring the mixture together in just five minutes, while kneading manually takes about ten minutes. Pull a small section to check your progress. Once the dough feels elastic, looks completely smooth, and holds together without snapping under tension, it is fully developed. Putting in this time is quite important, since failing to knead sufficiently prevents a wonderfully soft and fluffy texture. If you try a no-knead method instead, be aware that those variations dry out much faster the very next day compared to fully kneaded batches.
The dough needs a warm and draft-free environment to rise. You can create an ideal spot by running your empty clothes dryer for two minutes. Place the covered bowl inside the warm dryer and shut the door. The dough needs 30 minutes to an hour and a half to double in volume.
Forming the Buns
Punch the risen dough down to deflate it and shape it into a thick cylinder.
Cut the cylinder into 12 even sections. Press one piece flat on the counter and gather the edges together like a pouch. This stretches the top surface into a smooth dome. Cup your hand over the piece and move it in brief circles on the counter to tighten the shape into a firm ball.
The Second Rise
Arrange the shaped dough balls in a lined 9 x 13 inch (31.5 x 23.5 cm) baking tray. Place them in a 3 by 4 grid with the smooth tops facing up. Cover the tray loosely with oiled plastic wrap. The buns need 30 to 45 minutes to grow by 75 percent. They will puff up and stop just before reaching twice their starting size.
Piping the Crosses
The cross paste requires a thick and runny consistency. This texture allows the paste to maintain its shape without baking into hard sprigs. A thin paste causes the crosses to run down the sides of the buns during baking. Mix the regular flour and water until a flowing paste forms. Spoon the paste into a piping bag and snip a small hole in the corner. Work slowly as you pipe the crosses across the rows. Let the lines drape down the rounded sides of the buns.
Baking & Glazing
Bake the buns in a preheated 350°F (180°C) oven for 22 minutes. The tops will look well browned when they finish. A heated apricot jam glaze provides a clear and glossy finish on the baked goods. Place the apricot jam and water in a microwave-safe container and heat it for 30 seconds. Brush the warm jam mixture over the buns while they sit on a cooling rack.
You can substitute honey, golden syrup, or maple syrup for the jam. Omit the added water if you use maple syrup. Red jams can also replace the apricot jam, but they will add a red tint to the bun surface.
Cooling and storage
Buns eaten immediately out of the oven have a doughy and undercooked interior. Let the baked buns cool for 20 minutes to finalize the interior cooking process. Allow the buns to reach a warm temperature before serving. You can prepare the dough one day ahead and bake the buns the following day.
Soft and Sweet Traditional Hot Cross Buns from Scratch
The Dough & First Rise
- 1 egg, room temperature
- 4.25 cup bread flour
- 3 tsp instant or rapid rise yeast
- 0.5 cup caster sugar
- 0.25 cup extra bread flour
- 3.5 tbsp unsalted butter, melted and cooled
- 1.5 cup warm milk
- 1.5 cup sultanas
- 1 oranges, zest only
- 2 tsp all spice
- 2 tsp cinnamon powder
- 0.5 tsp salt
Piping the Crosses
- 0.5 cup flour
- 5 tbsp water
Baking & Glazing
- 1 tbsp apricot jam
- 2 tsp water
We may earn a small commission from grocery & equipment links, at no cost to you. Disclosure.
Method
The Dough & First Rise
Forming the Buns
The Second Rise
Piping the Crosses
Baking & Glazing
Substitutions
You can use active dry yeast or 27 grams of fresh yeast crumbled directly into the milk instead of instant yeast if that is what you have in your pantry.
Feel free to swap the apricot jam for honey, golden syrup, or plain maple syrup, but be sure to omit the extra water if you use maple.
Storage
You can easily prepare this wonderful dough one day ahead of time and bake the buns fresh the following day for a special morning treat.
Serving
It is so tempting to eat these right away, but letting the baked buns cool for twenty minutes finalizes the interior cooking process so they do not taste doughy.
Common mistakes
Make sure your milk feels pleasantly warm like bath water, because scalding hot milk will kill the yeast and prevent your beautiful buns from rising.
Mix your flour and water paste until it is thick but flowing, as a paste that is too thin will cause your crosses to run everywhere during baking.
Techniques
Because humidity changes how much flour you need, requiring a bit more in the summer and less in the winter, mix in that extra quarter cup of bread flour gradually. Stop as soon as the mixture clears the sides of your mixer while still feeling slightly sticky.
To create a wonderfully warm and draft-free environment for your first dough rise, try placing the covered bowl inside an empty clothes dryer that has run for just two minutes.
Verify the viability of an older batch of yeast by mixing a portion with warm water and sugar. Wait ten minutes to see if the surface becomes foamy, which confirms it will successfully rise the dough.
When shaping any kind of rolls or buns, gathering the dough edges underneath like a tight pouch stretches the top surface into a beautifully smooth dome.
- Store
- You can easily prepare this wonderful dough one day ahead of time and bake the buns fresh the following day for a special morning treat.
Will using standard white flour instead of bread flour ruin the Soft and Sweet Traditional Hot Cross Buns from Scratch?
Standard white flour will still work beautifully, but bread flour gives the dough a much fluffier texture. Either option will yield a delicious homemade treat for your family.
What can I use if I do not have apricot jam for the glaze?
You can easily swap the apricot jam for honey, golden syrup, or plain maple syrup during the Baking & Glazing step. Just remember to omit the extra water if you use maple syrup, and keep in mind that using a red jam will add a slight red tint to your beautiful buns.
Why did my cross pattern melt down the sides of the buns during baking?
This usually happens if your flour and water mixture is too thin. You want the mixture for Piping the Crosses to be a thick but flowing paste so it holds its shape perfectly in the oven without turning into hard sprigs.
How far in advance can I prepare this dough for a morning bake?
You can prepare the dough for The Dough & First Rise one day ahead of time. This lets you do the heavy lifting early so you can simply bake the buns fresh the following day.
Is it really necessary to let the baked buns rest before eating them?
It is incredibly tempting to eat them right away, but it is very important to let them cool for twenty minutes. This resting time finalizes the interior cooking process so the buns do not taste doughy or undercooked inside.
How can I tell if my yeast is still active before I start baking?
Always test your yeast by mixing a small amount with warm water and a pinch of sugar. If the mixture develops a beautifully foamy surface after ten minutes, it is alive and ready to use in your recipe.
What is the best way to shape rolls so they bake up perfectly round?
When shaping any kind of rolls or buns, gathering the dough edges underneath like a tight pouch is incredibly helpful. This motion stretches the top surface into a perfectly smooth dome that looks wonderful after baking.
Add a private note
Private to this device - jot your tweaks, swaps and timings. (Syncs to your account later.)
What to serve with it
See all →

You might also like
See all →


The Friday 3-recipe dinner plan 🧡
Every Friday: three tested weeknight dinners + one shopping list, ready to go. No spam, ever - unsubscribe anytime.