Make-Ahead Crispy Ground Beef Burritos
Simmering the meat with tomato paste and a simple spice blend keeps the filling perfectly juicy inside these make-ahead ground beef burritos.
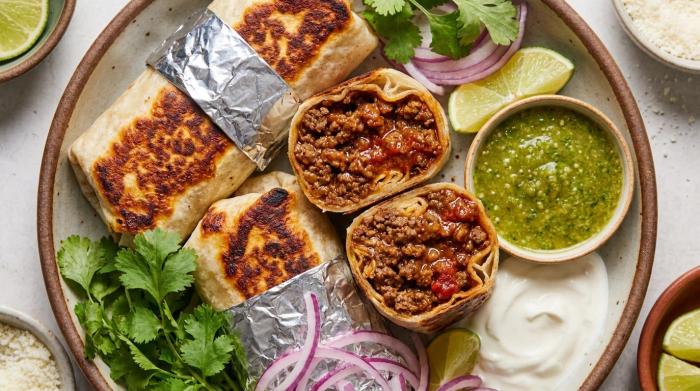
Soft tortillas wrapped around seasoned beef and rice create a meal that holds up well in the fridge or freezer. Simmering the meat with tomato paste keeps the inside juicy. A quick trip to a dry skillet makes the outside crunchy. This recipe yields 6 to 8 large crispy ground beef burritos.
The tortillas
You need large flour tortillas about 10 inches across to hold the heavy filling. Soft wraps resist breaking when you bend them. Warm the tortillas slightly before you start building your meal. Heat makes the bread bend easily so you can roll a tight cylinder without tearing the edges.
The Beef Filling
The seasoned Beef Filling provides all the moisture for the inside of the wrap. Start by browning lean ground beef with onion and garlic over high heat. Break the meat apart with your spoon until the red color disappears.
Add the dry Spice Mix, tomato paste, and water to the browned meat. A single packet of store-bought spice mix easily replaces the individual seasonings. Cook the mixture for three minutes until the liquid mostly evaporates, leaving behind a juicy Beef Filling. Take the pan off the heat and allow the meat to cool for 10 minutes before building your meal. Rolling piping hot meat creates internal steam that turns the tortillas mushy.
Vegetable and grain substitutions
Long grain white rice works nicely as the first component of the filling. Brown rice, quinoa, or a simple red rice are fine substitutes if you prefer a different grain. To increase the vegetable content, toss diced celery, bell peppers, carrots, zucchini, or extra corn into the skillet with the beef.
Assembly
Lay a warm tortilla flat on the counter. Spoon a scoop of rice slightly off-center near the bottom edge. Cover the rice with the beef. Pile the black beans, corn, fresh tomatoes, and red onions on top. Add iceberg lettuce if you plan to eat right away. Use sliced green cabbage instead if you want to freeze the meal. Cabbage survives the freezer much better than lettuce. Finish the pile with shredded melting cheese.
Pull the bottom edge of the tortilla up and over the mound of food. Fold both sides inward. Roll the package away from yourself to form a tight log. Wrap the whole thing securely in a sheet of foil. The foil holds the shape together and protects the bread during cooking.
Heat and Serve
Place the foil-wrapped packages directly into a dry pan over medium high heat. Leave them alone for a few minutes per side. The metal conducts heat to the tortilla, making the outside crunchy while the center warms up. Turn the burner down to medium low and continue heating for 10 minutes to melt the cheese completely.
You can also bake the wrapped packages on a baking tray in a 350°F (180°C) oven. A fresh batch needs 20 minutes to heat through and crisp the exterior. Serve the hot meal with small bowls of smooth salsa and guacamole. Plain yogurt works well as a substitute for sour cream.
Freezing and reheating
Prepare the meal for the freezer by wrapping the foil packages in a layer of plastic wrap. Store them inside an airtight container or a large freezer bag. Leave out raw vegetables with high water content like cucumber or avocado. They turn to mush when thawed. A small amount of diced tomato freezes fine, but cabbage is the only safe bet for a crunchy green layer.
You have several options for reheating frozen packages:
- Thaw the frozen packages for 24 hours in the refrigerator or leave them overnight at room temperature before you start cooking.
- Reheat thawed packages in their foil wrappers in a 350°F (180°C) oven for 30 to 40 minutes.
- Warm them entirely on the stove by keeping the foil on and turning them frequently in a dry pan over medium heat for at least 10 minutes.
- Microwave them by removing all foil and plastic wrap. Microwave on low for 2 minutes to defrost, then finish in a dry skillet to crisp the outside.
Make-Ahead Crispy Ground Beef Burritos
Burrito Seasoning
- 1 tsp each onion powder, dried oregano, salt
- 2 tsp each dried cumin powder, paprika
- 0.25 tsp black pepper
- 0.25 tsp cayenne pepper, or to taste, optional
Beef
- 1 lb lean ground beef, beef mince
- 2 garlic cloves
- 0.5 onion, finely chopped
- 2 tbsp tomato paste
- 0.5 tbsp olive oil
- 3 tbsp water
Burritos
- 1 cup black beans, canned, drained
- 3 cup iceberg lettuce or cabbage, finely sliced, use cabbage if freezing
- 1 cup corn kernels, canned, drained
- 3 tomatoes, deseeded and diced
- 0.5 red onion, finely chopped
- 6 large soft flour tortillas or round wraps, about 10 inches / 25 cm
- 3 cup cooked rice, warm not piping hot, white long grain
- 1.5 cup shredded cheese of choice, melting kind
- Finely chopped coriander or cilantro, optional
We may earn a small commission from grocery & equipment links, at no cost to you. Disclosure.
Method
Beef
Burritos
HEATING
Substitutions
Substitute brown rice or quinoa for the plain white rice when building the wraps.
Increase the vegetable content of the meat filling by stirring in diced bell peppers, extra corn, or chopped carrots while the ground beef cooks.
If you prefer a shortcut, a standard packet of store-bought spice mix easily replaces the individual spices.
Storage
Reheat thawed wraps in their foil wrappers on a baking tray in a 350°F (180°C) oven for 30 to 40 minutes.
Prepare the batch for the freezer by wrapping each portion tightly in foil and plastic wrap before storing them in an airtight container.
Serving
Finish your Heat and Serve process by plating the warm wraps alongside dipping bowls of guacamole, sour cream, yogurt, or smooth salsa.
Common mistakes
Use green cabbage instead of lettuce if you plan to freeze your batch, as watery vegetables turn mushy upon thawing.
Rolling the wraps with a piping hot Beef Filling creates internal steam that quickly turns the soft tortillas soggy.
Techniques
Always warm large flour tortillas briefly before rolling to make them pliable and prevent the bread from tearing.
Toasting wrapped tortillas in a dry skillet adds a crisp exterior while gently melting the cheese inside.
- Store
- Reheat thawed wraps in their foil wrappers on a baking tray in a 350°F (180°C) oven for 30 to 40 minutes. Prepare the batch for the freezer by wrapping each portion tightly in foil and plastic wrap before storing them in an airtight container.
Can I reheat a frozen wrap in the microwave?
Yes. Remove the foil and plastic wrap, then microwave the frozen package on low for two minutes to defrost. Finish it in a dry skillet to crisp the outside.
Why should I avoid adding cucumber or avocado if I plan to freeze my batch?
Raw vegetables with a high water content turn to mush when they thaw. If you want to freeze your meal, stick to cabbage and a small amount of diced tomato.
Why is it important to let the Beef Filling cool before rolling?
Wrapping a piping hot filling creates steam inside the tightly closed tortilla. That trapped moisture will quickly turn your bread soft and soggy.
Can I use a store-bought packet of spice mix instead of measuring out individual spices?
Yes, a standard packet of commercial spice mix is a perfect substitute for the dry Spice Mix ingredients. Simply stir it into the browned meat along with the tomato paste and water.
Why do recipes always recommend warming flour tortillas before building a wrap?
Gentle heat relaxes the starches in the bread, making the tortillas soft and pliable. This prevents the edges from cracking or tearing when you fold them tightly.
How long does it take to reheat a thawed batch in the oven?
Bake the thawed packages in their foil wrappers on a baking tray in a 350°F (180°C) oven. They will need 30 to 40 minutes to heat through completely.
What dips should I serve with this meal?
Serve your warm wraps with dipping bowls of guacamole, smooth salsa, and sour cream. Plain yogurt is also a great substitute for sour cream if you prefer.
How can I crisp the outside of a wrap without burning the bread?
Using a dry skillet over medium-high heat toasts the exterior evenly. Turning the package frequently ensures the bread gets crunchy without scorching while the inside warms up.
Add a private note
Private to this device - jot your tweaks, swaps and timings. (Syncs to your account later.)
What to serve with it
See all →

You might also like
See all →



The Friday 3-recipe dinner plan 🧡
Every Friday: three tested weeknight dinners + one shopping list, ready to go. No spam, ever - unsubscribe anytime.