Golden Stovetop Quesadilla with Beef, Chicken, or Veggies
The flour tortilla stays crisp because you let the filling cool down before you cook your Quesadilla (Beef, Vegetable or Chicken).
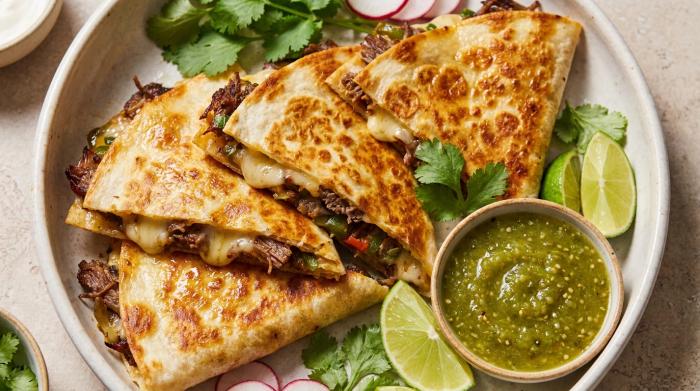
You can make crisp Quesadillas at home without a commercial griddle. The secret is letting your fillings cool down completely before they touch the flour tortilla. This recipe yields 6 to 8 quesadillas and relies on a covered skillet to melt the cheese before the outside burns.
The assembly process
Always cool your cooked meat or vegetable fillings completely before you put them on the tortillas. Warm fillings release moisture and steam the bread from the inside. This ruins the crisp texture you want. Place your cooled filling on just one half of an 8-inch (20 cm) flour tortilla so you can fold it over easily.
Layering your ingredients the right way keeps everything securely inside. Sprinkle your first handful of shredded cheese onto the tortilla, spoon on your meat or vegetable mixture, and then add a second layer of cheese. This creates a melted seal on the top and bottom to bind the halves together. Monterey Jack provides the ideal flavor and optimal melting qualities, but Colby, Cheddar, or your preferred cheese of choice will perform well too. Scatter the corn and chopped coriander over the filling just before you fold the tortilla closed.
Cooking on the stove
Cook your Quesadillas in a dry skillet over low to medium-low heat. Do not use oil in the pan. Oil conducts heat rapidly and makes the tortilla greasy. The bread will turn dark brown and burn before the internal cheese has time to melt. Place the folded tortilla in the hot dry skillet and press down lightly. Cover the pan with a tight lid during the first three minutes of cooking. The lid traps the heat inside the skillet and forces the cheese to melt evenly.
Take the lid off when it is time to cook the second side. Roll the quesadilla gently over its folded edge to flip it. If you flip the tortilla from the open side, the loose filling spills out into the pan. Lightly press down again and cook the second side with no lid for another three minutes. You can also bake the assembled tortillas in an oven if you need to cook a large batch for a crowd simultaneously.
Choosing your filling
Juicier cuts of meat yield much better results and textures for these fillings. Tomato paste acts as an important binder for both the beef and vegetable options while keeping the mixtures moist. You season all three options with a homemade mix of onion powder, dried oregano, salt, cumin, paprika, black pepper, and optional cayenne pepper.
For the beef option, you will brown the ground meat in the skillet alongside finely chopped onions, minced garlic, and diced red capsicum. Stirring in two tablespoons of tomato paste and 0.25 cup (65 ml) water gives the filling a delightfully moist texture while helping the ingredients bind together. If you prefer a different protein, feel free to swap the beef for ground pork or chicken. Really, any ground or chopped meat you happen to have on hand works beautifully inside these tortillas.
For the chicken variation, reach for skinless boneless thighs. These juicier cuts offer the best results for your filling. Coat the meat thoroughly with olive oil and your seasoning blend, then sear the pieces in a skillet until they take on a deep golden color. Give the cooked poultry a brief two minutes to rest on a cutting board before chopping it. Finally, stir the diced meat together with your sautéed onions and red capsicum. Should you want to try something different, you can easily replace the poultry with thinly sliced beef, pork, or steaks.
The vegetable filling combines drained black beans, capsicum, corn, and tomato paste. Skip the extra cup of loose corn during the final assembly step if you choose this option. The vegetable mixture already contains plenty of corn. You can mix in any other diced vegetables you need to use up.
Freezing and storage
You can assemble large batches of uncooked Quesadillas specifically for the freezer. Wrap each folded tortilla tightly in plastic wrap and keep them stored together in an airtight container. When you want a quick meal, thaw the wrapped tortillas in the microwave for 40 seconds before pan-frying them. You can also bake the frozen quesadillas directly in the oven from a frozen state. Roll the filled tortillas into flat burritos if you prefer a different shape. Wrap these flat burritos in foil, bake them, and freeze them for future use.
Cut each cooked piece in half on a wooden board. Eat the slices immediately after cooking so the tortilla remains hot and completely crisp.
Your hot Quesadillas are wonderful when paired with a few dipping sauces. Sour cream and salsa are always excellent choices for serving. You might also love an avocado sauce combining sour cream, citrus juice, garlic, and coriander. This dip even retains its green color for several days.
Golden Stovetop Quesadilla with Beef, Chicken, or Veggies
Quesadillas
- 1 portion Filling of Choice, beef, chicken, or vegetable
- 1 cup corn kernels, frozen and thawed, or canned and drained
- 6 flour tortillas, 8-inch, 20 cm
- 2 cup shredded Monterey Jack cheese, or other cheese of choice
- 0.75 cup roughly chopped coriander or cilantro
Spice Mix
- 1 tsp onion powder
- 1 tsp dried oregano
- 1 tsp salt
- 2 tsp cumin powder
- 2 tsp paprika
- 0.25 tsp black pepper
- 0.25 tsp cayenne pepper, optional
Beef Filling
- 1 lb ground beef or mince
- 2 garlic cloves, minced
- 0.5 onion, finely chopped
- 1 small red capsicum or bell pepper, diced
- 2 tbsp tomato paste
- 0.5 tbsp olive oil
- 0.25 cup water
Chicken Filling
- 1 lb skinless boneless chicken thighs
- 2 garlic cloves, minced
- 1 small onion, quartered and sliced
- 1 small red capsicum or bell pepper, diced
- 2.5 tbsp olive oil
Vegetable Filling
- 1 14-oz (400 g) can black beans, drained
- 1 onion, diced
- 2 clove garlic, minced
- 1 capsicum or bell pepper (any color), diced
- 1 cup corn, canned and drained, or frozen and thawed
- 0.25 cup tomato paste
- 2 tbsp vegetable oil
- 0.25 cup water
We may earn a small commission from grocery & equipment links, at no cost to you. Disclosure.
Method
Spice Mix
Beef Filling
Chicken Filling
Vegetable Filling
Quesadillas
Substitutions
Monterey Jack melts wonderfully, but you can easily swap in Cheddar, Colby, or Tasty cheese for excellent results.
Ground pork, veal, or turkey can easily take the place of the ground beef, and thinly sliced steak is a great alternative if you want to skip the chicken.
Storage
You can freeze assembled uncooked Quesadillas wrapped tightly in plastic, then either bake them straight from frozen or thaw them in the microwave for 40 seconds before pan-frying.
Serving
Serve your cooked Quesadillas immediately alongside bowls of sour cream, salsa, or vibrant avocado sauce to ensure the tortillas stay perfectly hot and crispy.
Common mistakes
Be careful to roll the Quesadillas over their folded edge when flipping, otherwise you risk spilling your delicious filling directly into the pan.
Avoid cooking on high heat, which will quickly burn the outside of the tortilla before your cheese has a chance to melt.
Techniques
Always let your fillings cool down completely before assembling your Quesadillas, as warm mixtures will steam the inside of the tortilla and ruin that lovely crunch.
Layering your cheese both below and above the main filling acts like a tasty glue to hold everything together beautifully.
Grating your own cheese from a block rather than buying it pre-shredded will give you a much smoother and creamier melt.
Allowing seared meat to rest for a couple of minutes on a cutting board before dicing helps it retain its natural juices.
- Store
- You can freeze assembled uncooked Quesadillas wrapped tightly in plastic, then either bake them straight from frozen or thaw them in the microwave for 40 seconds before pan-frying.
Is it possible to assemble a large quantity of these ahead of time for fast weekday dinners?
Yes, you can assemble uncooked Quesadillas, wrap them tightly in plastic, and keep them in an airtight container in the freezer. When you want a quick meal, either bake them straight from frozen or thaw them in the microwave for 40 seconds before pan-frying.
Will the avocado dipping sauce turn brown if I make it a day early?
There is no need to worry about discoloration. The citrus juice in the avocado sauce keeps it a bright, vibrant green for several days in the refrigerator.
What is the best way to present and enjoy this dish?
Slice the finished quesadilla down the middle on a cutting board and bring it to the table right away. This quick timing guarantees the tortilla stays hot and crispy. Offer bowls of salsa, sour cream, or avocado sauce alongside your meal.
Why did my tortilla get soggy and lose its crispness?
This usually happens if your cooked meat or vegetable mixtures were still warm during assembly. Warm fillings release moisture and steam the tortilla from the inside, so always let them cool down completely first.
Half of my filling fell out when I tried to flip it. What went wrong?
Always make sure to roll the folded Quesadillas gently over their creased edge rather than lifting from the open side. Making sure you layer cheese both below and above the main filling will also act as a tasty glue to hold everything securely together.
I am making the vegetable version. Should I still add the extra cup of corn right before folding?
You can skip that extra cup of loose corn during the final assembly step. The vegetable filling already contains plenty of corn, so adding more is not necessary.
Does it matter if I buy pre-shredded cheese instead of grating it myself?
Grating your own cheese from a block will always give you a much smoother and creamier melt. Pre-shredded options simply do not melt together as flawlessly.
Why do I need to let the chicken rest before dicing it?
Allowing any seared meat to rest for a couple of minutes off the heat helps it retain its natural juices. If you cut into it immediately, those juices will run out onto your cutting board and leave the meat dry.
Add a private note
Private to this device - jot your tweaks, swaps and timings. (Syncs to your account later.)
What to serve with it
See all →
You might also like
See all →

The Friday 3-recipe dinner plan 🧡
Every Friday: three tested weeknight dinners + one shopping list, ready to go. No spam, ever - unsubscribe anytime.